Saturday 30 November 2013

Sweet Lilac Paper Flowers

NOVEMBER BLOG CHALLENGE - CHRISTMAS 

New to the blog challenge world and as I had fallen in love with Sweet Lilac Flowers, I had to make this one of my first challenges.


Having recently bought  some Sweet Lilac Flowers and also Craftwork Cards Christmas Post Kit, I felt they would compliment each other.

ITEMS USED
Craftwork Cards Christmas Post Kit

  • 6x6 white card & envelope
  • Paper Pad
  • Die cut Tag

Sweet Lilac Paper Flowers 

  • 3 x Red Poinsettia
  • 2 x Brown Poinsettia
Embellishments/Die cuts
  • Cheery Lyn Die - Holly Flourish
  • Brown ribbon - From Stash
  • Pearls (Coloured with Gold metallic Sharpie)
  • Gold Mirror Card

 
Picking a backing paper was my first challenge, but once I made my mind up there was no stopping my imagination. I cut a corner from the paper sheet using my Crafter's Companion cutter as it was able to cut a scalloped edge. I mounted this to the 6x6 white base card, attached the brown ribbon (from my stash) and using my hot glue gun, I attached the beautiful Poinsettias.

Using my Big Shot and the Cheery Lyn Holly Flourish die I cut two flourishes from Gold Mirror Card and attached them loosely behind the Poinsettias. I placed the Christmas Post Tag over the flourishes in 3D fashion using hot glue.

Finally, I coloured three pearls with a gold metallic Sharpie.


Hope you have enjoyed reading this blog and I must thank Jo Rice for her support and encouragement when I asked about Sweet Lilac and this challenge.

Best wishes

Karen

Dark of December - Christmas card


This is my first Clarity challenge and I have based this card on  'The Dark of December' verse stamp from Clarity Stamps

'I heard a bird sing...'
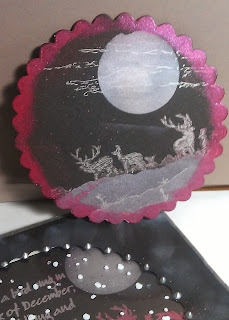
I began by die cutting a scalloped circle using an x-cut circle die on black card (from my stash), then I laid some of the Clarity Stamps Snowflakes stencils and sponged around them with Momento Brilliance Moonlight White. I then cut a piece of Hunkydory Snowfall Acetate and fixed this with red double sided tape to the reverse of the black card over the aperture.

For the aperture background, I used versamark and stamped the verse which I then burnished with Perfect Pearls - Perfect Pearl. Using a circle punch, I punched a stencil from a scrap piece of paper and again versamarked the moon which I also burnished with Perfect Pearl. I then took the Clarity Stamp Deerscape stamp and inked with versamark, then burnished with Red Lipstick mica powder (Stamps Away).

I used 3D foam tape to mount the Deerscape piece into the aperture.

I finished the card by adding a piece of white organza ribbon, topped with a red scalloped circle which I stamped with the Clarity Sentiment Stamp 'Merry Christmas and a Happy New Year' .
Finally, I used Pinflair Silver Pearl Wand around the aperture, Ranger Red Stickles on the snowflakes and edged the card with a metallic silver Promarker. I then mounted the finished piece onto a white base card from my stash.

I also made a piece to compliment the card which could be used as a tag.


This is a close up of the moon on the tag burnished with Perfect Pearls and highlights with a silver gel pen.


Hope you have enjoyed reading this blog and I must thank Emma Burns for her support and guidance in blog techniques.

Best wishes

Karen


Wednesday 13 November 2013

Never trap a Butterfly....


Never trap a butterfly . . .

Designed by Karen Gartland
Here is my first blog entry....I am very busy with family etc so not sure how often I will actually be able to blog, but I will try and add photos of projects and then add details when I find time.

 The card was created by cutting a mat from a piece of black card, then rounding the corners with a corner punch. I used an anti static bag to dust the black card, then inked up a wood mounted butterfly stamp with archival ink and stamped it onto the card. Next I heat embossed it with the clear embossing powder
For the central topper image, I took a piece of white card, stamped another wood mounted image with archival (black) and then took clear boot wax polish onto my foam, dipped into mica and gently rubbed over the image.

I took a DL size piece of centura pearl, using photo glue mounted the black mat, then using foam pads mounted the topper and to finish off the front I embellished the corners using Pinflair liquid pearls.

Thank you for looking and Happy crafting ...